As you might have heard, we just introduced the InterSystems API Manager (IAM); a new feature of the InterSystems IRIS Data Platform™, enabling you to monitor, control and govern traffic to and from web-based APIs within your IT infrastructure. In case you missed it, here is the link to the announcement.
In this article, I will show you how to set up IAM and highlight some of the many capabilities IAM allows you to leverage. InterSystems API Manager brings everything you need
- to monitor your HTTP-based API traffic and understand who is using your APIs; what are your most popular APIs and which could require a rework.
- to control who is using your APIs and restrict usage in various ways. From simple access restrictions to throttling API traffic and fine-tuning request payloads, you have fine-grained control and can react quickly.
- to protect your APIs with central security mechanisms like OAuth2.0 or Key Token Authentication.
- to onboard third-party developers and provide them with a superb developer experience right from the start by providing a dedicated Developer Portal for their needs.
- to scale your API demands and deliver low-latency responses
I am excited to give you a first look at IAM, so let's get started right away.
Getting started
IAM is available as a download from the WRC Software Distribution site and is deployed as a docker container of its own. So, make sure to meet the following minimum requirements:
- The Docker engine is available. Minimum supported version is 17.04.0+.
- The docker-compose CLI tool is available. Minimum supported version is 1.12.0+.
The first step requires you to load the docker image via
This makes the IAM image available for subsequent use on your machine. IAM runs as a separate container so that you can scale it independently from your InterSystems IRIS backend. To start IAM requires access to your IRIS instance to load the required license information. The following configuration changes have to happen:
- Enable the /api/IAM web application
- Enable the IAM user
- Change the password of the IAM user
Now we can configure our IAM container. In the distribution tarball, you will find a script for Windows and Unix-based systems named "iam-setup". This script helps you to set the environment variables correctly, enabling the IAM container to establish a connection with your InterSystems IRIS instance. This is an exemplary run from my terminal session on my Mac:
Welcome to the InterSystems IRIS and InterSystems API Manager (IAM) setup script.
This script sets the ISC_IRIS_URL environment variable that is used by the IAM container to get the IAM license key from InterSystems IRIS.
Enter the full image repository, name and tag for your IAM docker image: intersystems/iam:0.34-1-1
Enter the IP address for your InterSystems IRIS instance. The IP address has to be accessible from within the IAM container, therefore, do not use "localhost" or "127.0.0.1" if IRIS is running on your local machine. Instead use the public IP address of your local machine. If IRIS is running in a container, use the public IP address of the host environment, not the IP address of the IRIS container. xxx.xxx.xxx.xxx
Enter the web server port for your InterSystems IRIS instance: 52773
Enter the password for the IAM user for your InterSystems IRIS instance:
Re-enter your password:
Your inputs are:
Full image repository, name and tag for your IAM docker image: intersystems/iam:0.34-1-1
IP address for your InterSystems IRIS instance: xxx.xxx.xxx.xxx
Web server port for your InterSystems IRIS instance: 52773
Would you like to continue with these inputs (y/n)? y
Getting IAM license using your inputs...
Successfully got IAM license!
The ISC_IRIS_URL environment variable was set to: http://IAM:****************@xxx.xxx.xxx.xxx:52773/api/iam/license
WARNING: The environment variable is set for this shell only!
To start the services, run the following command in the top level directory: docker-compose up -d
To stop the services, run the following command in the top level directory: docker-compose down
URL for the IAM Manager portal: http://localhost:8002
I obfuscated the IP address and you can't see the password I used, but this should give you an idea how simple the configuration is. The full image name, IP address and port of your InterSystems IRIS instance and the password for your IAM user, that's everything you need to get started.
Now you can start your IAM container by executing
This orchestrates the IAM containers and ensures everything is started in the correct order. You can check the status of your containers with the following command:
Opening localhost:8002 in my browser brings up the web-based UI:
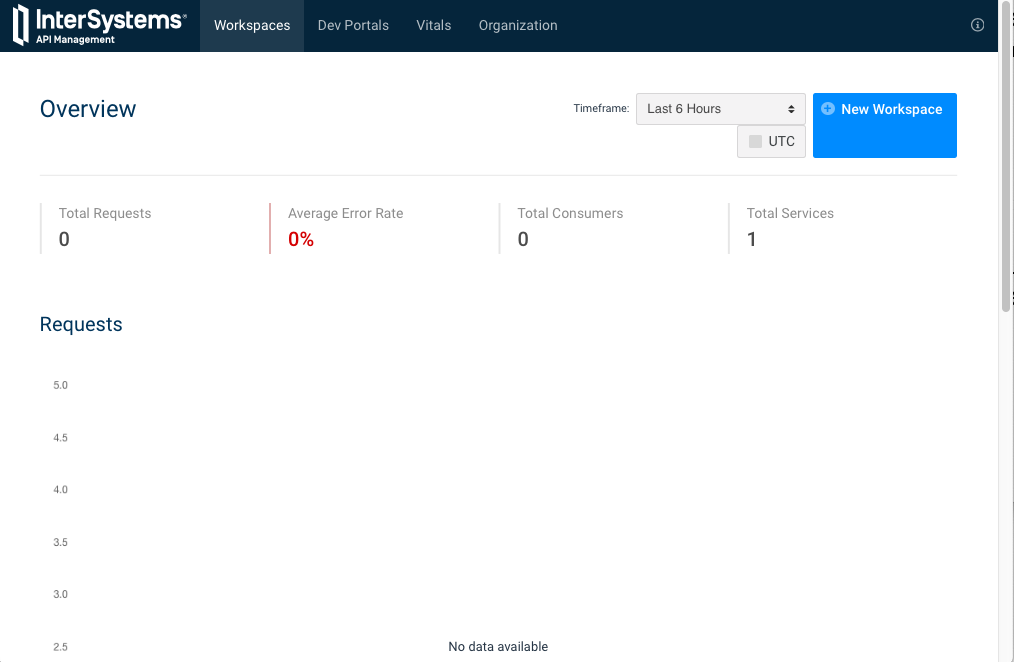
The global report does not show any throughput yet, as this is a brand new node. We will change that shortly. You can see that IAM supports a concept of workspaces to separate your work into modules and/or teams. Scrolling down and selecting the "default" workspace brings us to the Dashboard for, well, the "default" workspace we will use for our first experiments.
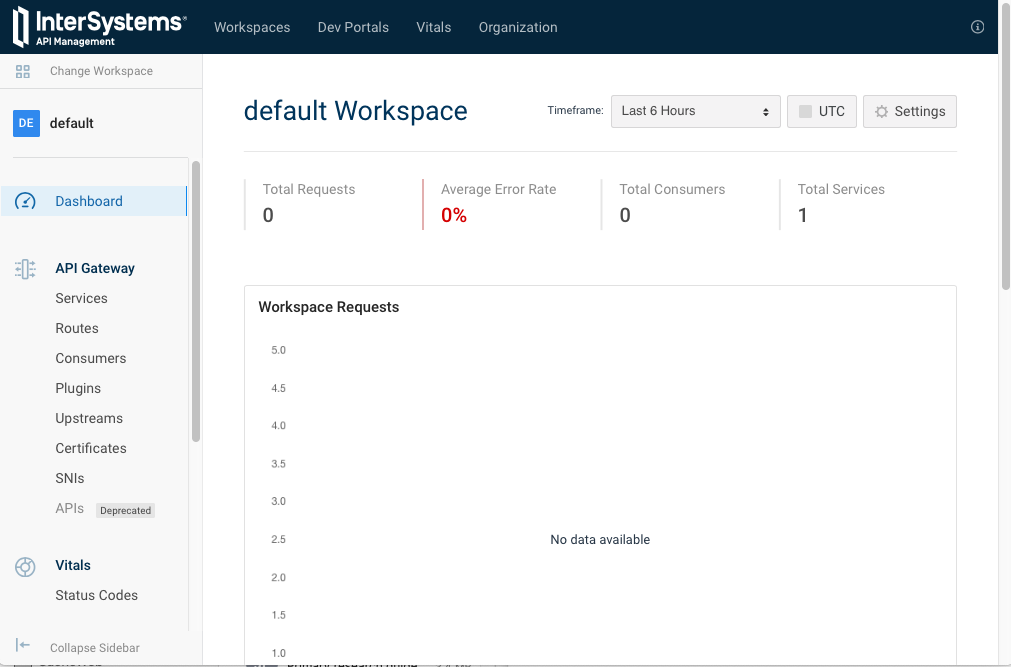
Again, the number of requests for this workspace is still zero, but you get a first look at the major concepts of the API Gateway in the menu on the left side. The first two elements are the most important ones: Services and Routes. A service is an API we want to expose to consumers. Therefore, a REST API in your IRIS instance is considered a service, as is a Google API you might want to leverage. A route decides to which service incoming requests should be routed to. Every route has a certain set of conditions and if the conditions are fulfilled the request is routed to the associated service. To give you an idea, a route can match the IP or domain of the sender, HTTP methods, parts of the URI or a combination of the mentioned examples.
Let's create a service targeting our IRIS instance, with the following values:
| field | value | description |
|---|---|---|
| name | test-iris | the logical name of this service |
| host | xxx.xxx.xxx.xxx | public IP-address of your IRIS instance |
| port | 52773 | the port used for HTTP requests |
| protocol | http | the protocols you want to support |
Keep the default for everything else. Now let's create a route:
| field | value | description |
|---|---|---|
| paths | / api /atelier | requests with this path will be forwarded to our IRIS instance |
| protocols | http | the protocols you want to support |
| service | test-iris | requests matching this route will be forwarded to this service |
Again, keep the default for everything else. IAM is listening on port 8000 for incoming requests by default. From now on requests that are sent to http://localhost:8000 and start with the path /api/atelier will be routed to our IRIS instance. Let's give this a try in a REST client (I am using Postman).
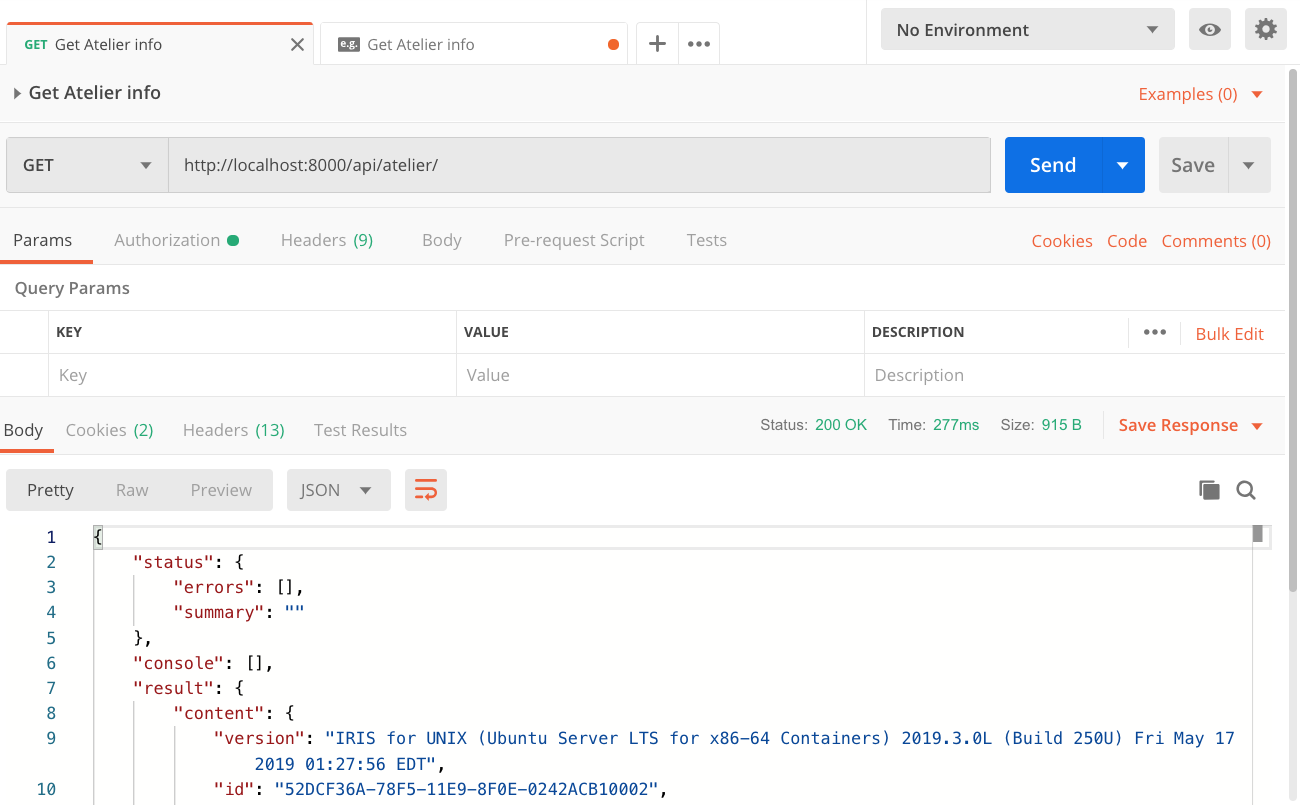
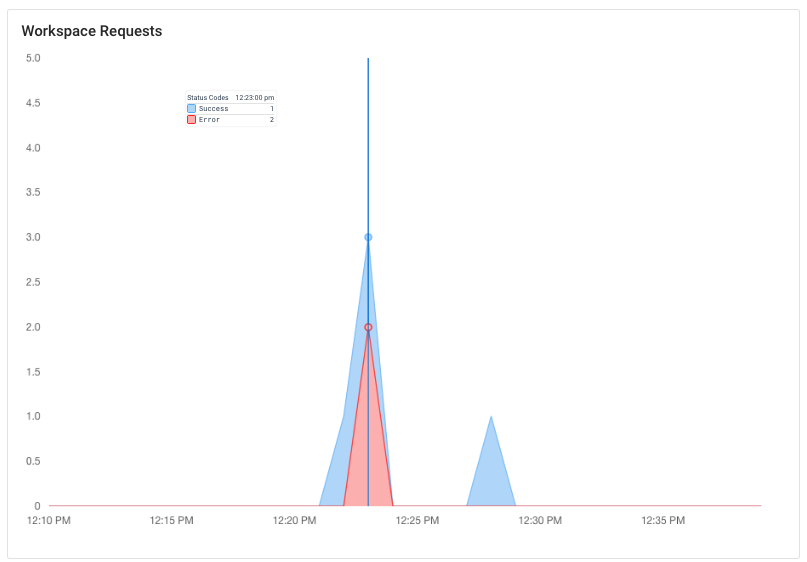
Sending a GET request to http://localhost:8000/api/atelier/ indeed returns a response from our IRIS instance. Every request goes through IAM and metrics like HTTP status code, latency, and consumer (if configured) are monitored. I went ahead and issues a couple more requests (including two requests to non-existing endpoints, like /api/atelier/test/) and you can see them all aggregated in the dashboard:
Working with plugins
Now that we have a basic route in place, we can start to manage the API traffic. Now we can start to add behavior that complements our service. Now the magic happens.
The most common way to enforce a certain behavior is by adding a plugin. Plugins isolate a certain functionality and can usually be attached to certain parts of IAM. Either they are supposed to affect the global runtime or just parts like a single user (group), a service or a route. We will start by adding a Rate Limiting plugin to our route. What we need to establish the link between the plugin and the route is the unique ID of the route. You can look it up by viewing the details of the route.
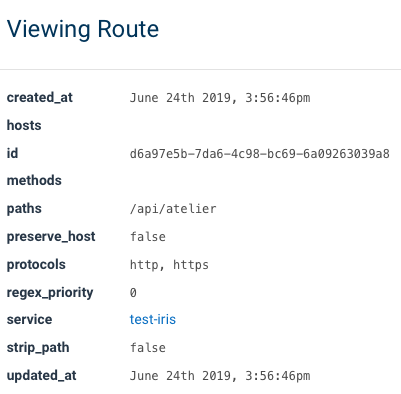
If you are following this article step by step, the ID of your route will be different. Copy the ID for the next step.
Click on Plugins on the left sidebar menu. Usually, you see all active plugins on this screen, but as this node is relatively new, there are no active plugins yet. So, move on by selecting "Add New Plugin".
The plugin we are after is in the category "Traffic Control" and is named "Rate Limiting". Select it. There are quite a few fields that you can define here as plugins are very flexible, but we only care about two fields:
| field | value | description |
| route_id | d6a97e5b-7da6-4c98-bc69-6a09263039a8 | paste the ID of your route here |
| config.minute | 5 | number of calls allowed per minute |
That's it. The plugin is configured and active. You probably have seen that we can pick from a variety of time intervals, like minutes, hours or days but I deliberately used minutes as this allows us to easily understand the impact of this plugin.
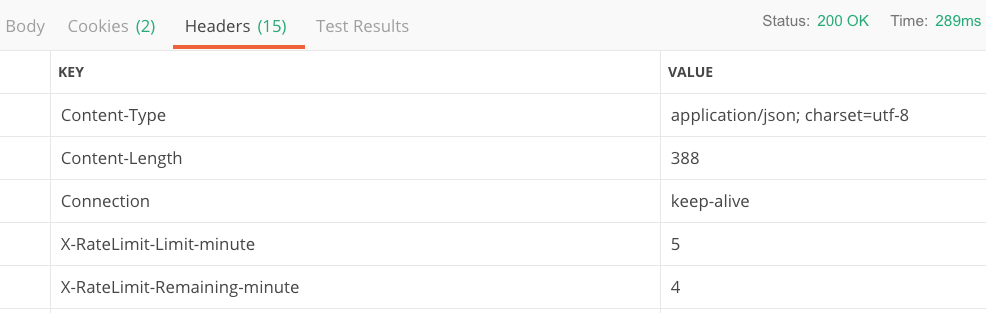
If you send the same request again in Postman you will realize that the response comes back with 2 additional headers. XRateLimit-Limit-minute (value 5) and XRateLimit-Remaining-minute (value 4). This tells the client that he can make up to 5 calls per minute and has 4 more requests available in the current time interval.
If you keep making the same request over and over again, you will eventually run out of your available quota and instead get back an HTTP status code 429 with the following payload:
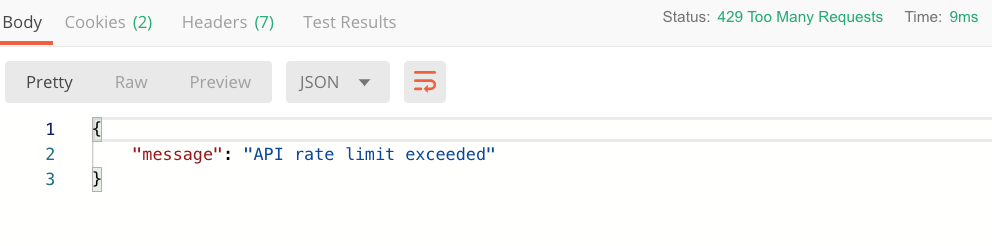
Wait until the minute is over and you will be able to get through again. This is a pretty handy mechanism allowing you to achieve a couple of things:
- Protect your backend from spikes
- Set an expectation for the client how many calls he is allowed to make in a transparent way for your services
- Potentially monetize based on API traffic by introducing tiers (e.g. 100 calls per hour at the bronze level and unlimited with gold)
You can set values for different time intervals and hereby smoothing out API traffic over a certain period. Let's say you allow 600 calls per hour for a certain route. That's 10 calls per minute on average. But you are not preventing clients from using up all of their 600 calls in the very first minute of their hour. Maybe that's what you want. Maybe you would like to ensure that the load is distributed more equally over the hour. By setting the config_minute field to 20 you ensure that your users are not making more than 20 calls per minute AND 600 per hour. This would allow some spikes on the minute-level interval as they can only make 10 calls per minute on average, but users can't use up the hourly quota in a single minute. Now it will take them at least 30 minutes if they hit your system with full capacity. Clients will receive additional headers for each configured time interval, e.g.:
| header | value |
|---|---|
| X-RateLimit-Limit-hour | 600 |
| X-RateLimit-Remaining-hour | 595 |
| X-RateLimit-Limit-minute | 20 |
| X-RateLimit-Remaining-minute | 16 |
Of course, there are many different ways to configure your rate-limits depending on what you want to achieve.
I will stop at this point as this is probably enough for the first article about InterSystems API Manager. There are plenty more things you can do with IAM, we've just used one out for more than 40 plugins and haven't even used all of the core concepts yet! Here are a couple of things you can do as well and I might cover in future articles:
- Add a central authentication mechanism for all your services
- Scale-out by load-balancing requests to multiple targets that support the same set of APIs
- Introduce new features or bugfixes to a smaller audience and monitor how it goes before you release it to everyone
- Onboard internal and external developers by providing them a dedicated and customizable developer portal documenting all APIs they have access to
- Cache commonly requested responses to reduce response latency and the load on the service systems
So, let's give IAM a try and let me know what you think in the comments below. We worked hard to bring this feature to you and are eager to learn what challenges you overcome with this technology. Stay tuned...
More resources
The official Press Release can be found here: InterSystems IRIS Data Platform 2019.2 introduces API Management capabilities
A short animated overview video: What is InterSystems API Manager
An 8-minute video walking you through some of the key highlights: Introducing InterSystems API Manager
The documentation is part of the regular IRIS documentation: InterSystems API Manager Documentation

Nice to have a clear step-by-step example to follow!
Hi @Stefan Wittmann !
If IRIS API Manager is published on InterSystems Docker Hub?
No, it is not for multiple reasons. We have plans to publish the InterSystems API Manager on Docker Repositories at a later point, but I can't give you an ETA.
docker load -I iam_image.tardid not work for me.I used
docker import aim_image.tar iaminstead and it worked.Have you unpacked the IAM-0.34-1-1.tar.gz?
Originally I was trying to import the whole archive, which failed. After unpacking container it was imported successfully.
Hi, I didn't have any problems loading the image, but when I run the setup script, I get the following error:
Your inputs are:Full image repository, name and tag for your IAM docker image: intersystems/iam:0.34-1-1
IP address for your InterSystems IRIS instance: xxx.xxx.xxx.xxx
Web server port for your InterSystems IRIS instance: 52773
Would you like to continue with these inputs (y/n)? y
Getting IAM license using your inputs...
No content. Either your InterSystems IRIS instance is unlicensed or your license key does not contain an IAM license.
Which license is required for IAM?
We have installed Intersystems IRIS for Health in 2019.3 version on this server.
$ iris listConfiguration 'IRISDEV01' (default)directory: /InterSystems
versionid: 2019.3.0.304.0
datadir: /InterSystems
conf file: iris.cpf (SuperServer port = 51773, WebServer = 52773)
status: running, since Tue Aug 13 08:27:34 2019
state: warn
product: InterSystems IRISHealth
Thanks for your help!
Please write to InterSystems to receive your license.
While trying to do this I've used both my public IP address and my VPN IP address and I get the error
Couldn't reach InterSystems IRIS at xxx.xx.x.xx:52773. One or both of your IP and Port are incorrect.Strangely I got this to work last week without having the IAM application or user enabled. That said I was able to access the IAM portal and set some stuff up but I'm not sure it was actually truly working.
Any troubleshooting advice?
Michael,
please create a separate question for this comment.
Hello @Stefan Wittmann
thanks for the detailed tutorial.
Exists a community free version of API Manager in order to use it with the Iris Community version?
Thank you.
The documentation link at the end of the post has changed. Here's the current one.